SmoothSec - Intrusion detection made simple.
Welcome to SmoothSec!
The SmoothSec team is glad you've stopped by and are excited to get started with Network Security Monitoring using the best tools available today. SmoothSec bundles all of these tools together and creates a simple platform for you to deploy highly customizable NSM solution within minutes.From the complete beginner to the seasoned veteran, SmoothSec's goal it to make NSM more effective and approachable. We sincerely hope you enjoy the guides available on this wiki, and we look forward to any feedback or suggestions you may have regarding improving this documentation.
Understanding NSM
New to Network Security Monitoring or "NSM"? This section is for you! Why do we have this section before the installation guide? Having a high level understanding of NSM and how it works within the context of SmoothSec will help you select the best installation method for your purposes, and introduce you to the family of brilliant applications that SmoothSec bundles together for you.


Installing SmoothSec
Ok, now that you understand NSM and SmoothSec at a high level, lets get the simplest setup going. We're going to be demonstrating installation of SmoothSec as an IDS since, with everything on the same box. This is definitely the easiest way to get started with NSM and the best part is you get to see everything going on in your network, learn how to tune your IDS, and at the same time not impact your production traffic (whether that's customer, intra-office, or intra-house :) ).There a TONS of different physical setups, and it's impossible to cover them all. In general, you need two NIC's in whatever your server will be. One to manage the device and access the web GUI, and one to accept the spanned traffic. All this being said, here are the stats on our test box:
- VMware VM (Hardware Version 9)
- 4 vCPU's
- 8GB of RAM
- 2 vNIC's (SPAN, mgmt)
- 500GB of Storage
- 1GB network throughout


Snorby advanced configuration
Snorby timezone setup.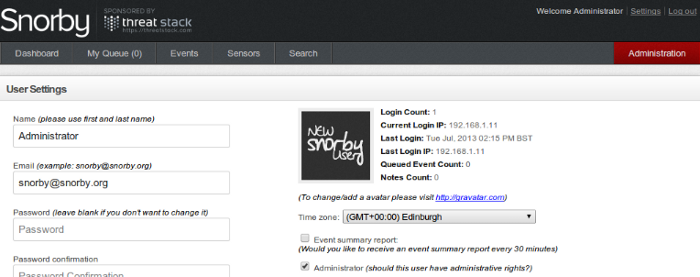
Snorby display events timestamps in UTC, to change the timezone associated with your snorby installation just follow these steps:
- Log into Snorby web wui.
- Click settings.
- Go to Time zone.
- Select your timezone.
- Enter again the Password confirmation field.
- Click Update Settings
You need to edit /var/www/snorby/config/initializers/mail_config.rb
Gmail
This option uses Gmail over TLS (authentication is encrypted):ActionMailer::Base.delivery_method = :smtp
ActionMailer::Base.smtp_settings = {
:address => "smtp.gmail.com",
:port => 587,
:domain => "snorby.org",
:user_name => "snorby",
:password => "snorby",
:authentication => "plain",
:enable_starttls_auto => true
An important note - if TLS fails, the password will be sent in plain text.Sendmail or Postfix
This method uses sendmail configured locally on your Snorby server. The :location is the full path to the sendmail binary, and the :arguments accepts any arguments that sendmail accepts (see: man sendmail(8)).ActionMailer::Base.delivery_method = :sendmail
ActionMailer::Base.sendmail_settings = {
:location => '/usr/sbin/sendmail',
:arguments => '-i -t'
}
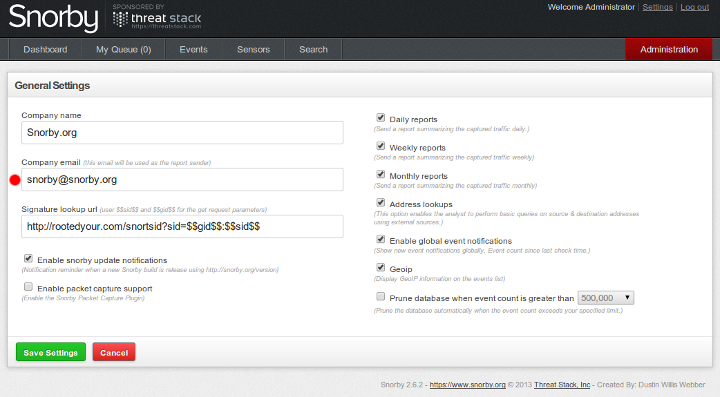
Editing the Report Sender
This is configured under the Administrator account in the Snorby web interface. Go to Administration -> General Settings-> and change "Company email" to the email address you want your reports to come from.
IDS management
The general configuration file for the IDS is located in /etc/ids.cfgIDS commands
Snort commands:
Start Snort:
/etc/init.d/snort/startStop Snort:
/etc/init.d/snort/stopRestart Snort:
/etc/init.d/snort/restartDisable Snort at boot time:
/etc/init.d/snort/disableEnable Snort boot time:
/etc/init.d/snort/enableSuricata commands:
Start suricata:
/etc/init.d/suricata/startStop suricata:
/etc/init.d/suricata/stopRestart suricata:
/etc/init.d/suricata/restartDisable suricata at boot time:
/etc/init.d/suricata/disableEnable suricata boot time:
/etc/init.d/suricata/enableSwitch IDS script
smoothsec.switch.engineThis script will allow users to switch between IDS engines on the fly, Snort to Suricata, Suricata to Snort or to enable both IDS engines.

IDS Rules Management
Additional tools
tcpxtract - tcpxtract is a tool for extracting files from network traffic.netdiscover - an active/passive address reconnaissance tool.
ngrep - a pcap-aware tool that will allow to search regular expressions into data payloads of packets.
nast - is a packet sniffer and a LAN analyzer
ipgrab - A Verbose Packet Sniffer.
tshark - Dump and analyze network traffic.
greppcap.py - A tool to finds data in a pcap using a user-specified regular expression.
percona-toolkit
percona-xtrabackup
See more:
https://github.com/smoothsec/dev/tree/samiux
http://samiux.blogspot.co.uk/2013/09/howto-high-performance-idsips-with_24.html
http://samiux.blogspot.co.uk/2013/09/howto-high-performance-idsips-with.html
https://github.com/smoothsec/docs/wiki/Installing-Suricata-on-Dell-R710---non-free-drivers-needed
http://samiux.blogspot.co.uk/2013/09/howto-15-minutes-to-deploy-ids-with.html
http://samiux.blogspot.co.uk/2013/09/howto-30-minutes-to-deploy-distributed.html

Nhận xét
Đăng nhận xét