How To Install Zimbra 8.5.0 on CentOS 7 Part 1
Usually, i am always using SUSE Linux Enterprise Server as operating
system for Zimbra Mail Server. But, starting from Zimbra 9.x.x, SLES has
been deprecated (end of life) and may be will not supported by Zimbra.
Therefore, i attempt to using CentOS as operating system for Zimbra. For
easy understanding, this is my information system
First, we must configure network on CentOS. Assuming name of your network interface is eth0
# Configure Disable Selinux & Firewall
Open file /etc/sysconfig/selinux and change SELINUX=enforcing become SELINUX=disabled. Also disable some service such as iptables, ip6tables and firewalld.
# Configure /etc/hosts, /etc/resolv.conf and hostname
Open file /etc/hosts and configure as follows
# Disable service sendmail or postfix
Do the following command as root
# Update repo and install package dependency by Zimbra
# Configure local DNS Server
Zimbra needed lookup to MX records on domain that used. For that purpose, we can configure dns server on machine of Zimbra mail server
Open file /etc/named.conf and add any on listen-on port 53 and allow-query as follows
Create a zone on the bottom of file named.conf as follows
Create database for new zone has been created on folder /var/named/
fill as follows
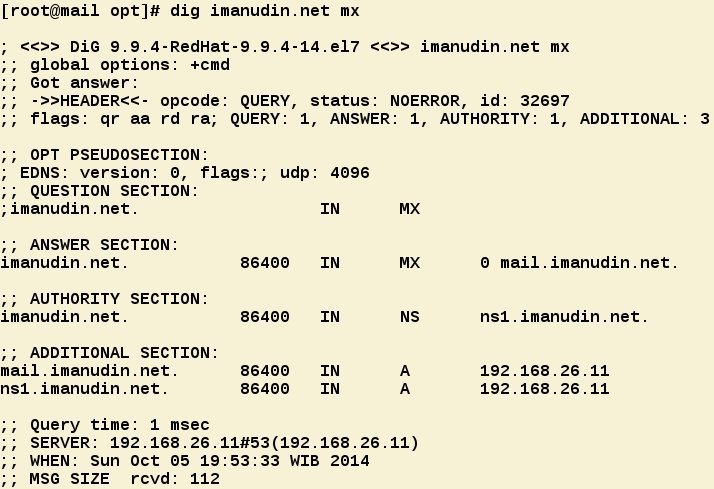
# Restart Service & Check results configuring DNS Server
If results from above command as follows, your configuration dns has been success
Preparation for install Zimbra has been finished. Now we can install zimbra and will explained on next section.
Good luck and hopefully useful
Domain     : imanudin.net
Hostname   : mail
IP Address : 192.168.26.11
# Configure Network
First, we must configure network on CentOS. Assuming name of your network interface is eth0
vi /etc/sysconfig/network-scripts/ifcfg-eth0DEVICE=eth0 ONBOOT=yes NM_CONTROLLED=no BOOTPROTO=none IPADDR=192.168.26.11 NETMASK=255.255.255.0 DNS1=192.168.26.11 GATEWAY=192.168.26.2 DNS2=192.168.26.2 USERCTL=noRestart network service and setup for automatic boot
1.service network restart2.chkconfig network on# Configure Disable Selinux & Firewall
Open file /etc/sysconfig/selinux and change SELINUX=enforcing become SELINUX=disabled. Also disable some service such as iptables, ip6tables and firewalld.
1.setenforce 02.service firewalld stop3.service iptables stop4.service ip6tables stop5.systemctl disable firewalld6.systemctl disable iptables7.systemctl disable ip6tablesOpen file /etc/hosts and configure as follows
127.0.0.1     localhost
192.168.26.11 mail.imanudin.net mail
Open file /etc/resolv.conf and configure as follows
search imanudin.net
nameserver 192.168.26.11
nameserver 192.168.26.2
nameserver 8.8.8.8
Do the following command as root
1.hostname mail.imanudin.net2.echo "HOSTNAME=mail.imanudin.net" >> /etc/sysconfig/network# Disable service sendmail or postfix
Do the following command as root
1.service sendmail stop2.service postfix stop3.systemctl disable sendmail4.systemctl disable postfix# Update repo and install package dependency by Zimbra
1.yum update2.yum -y install perl perl-core wget screen w3m elinks openssh-clients openssh-server bind bind-utils unzip nmap sed nc sysstat libaio rsync telnet aspell# Configure local DNS Server
Zimbra needed lookup to MX records on domain that used. For that purpose, we can configure dns server on machine of Zimbra mail server
Open file /etc/named.conf and add any on listen-on port 53 and allow-query as follows
listen-on port 53 { 127.0.0.1; any; };
allow-query     { localhost; any; };
Create a zone on the bottom of file named.conf as follows
zone "imanudin.net" IN {
type master;
file "db.imanudin.net";
allow-update { none; };
};
Create database for new zone has been created on folder /var/named/
1.touch /var/named/db.imanudin.net2.chgrp named /var/named/db.imanudin.net3.vi /var/named/db.imanudin.netfill as follows
$TTL 1D
@       IN SOA  ns1.imanudin.net. root.imanudin.net. (
                                        0       ; serial
                                        1D      ; refresh
                                        1H      ; retry
                                        1W      ; expire
                                        3H )    ; minimum
@       IN      NS      ns1.imanudin.net.
@       IN      MX      0 mail.imanudin.net.
ns1     IN      A       192.168.26.11
mail    IN      A       192.168.26.11
# Restart Service & Check results configuring DNS Server
1.service named restart2.systemctl enable named3.nslookup mail.imanudin.net4.dig imanudin.net mxIf results from above command as follows, your configuration dns has been success
[root@mail opt]# nslookup mail.imanudin.net
Server:         192.168.26.11
Address:        192.168.26.11#53
Name: mail.imanudin.net
Address: 192.168.26.11
Preparation for install Zimbra has been finished. Now we can install zimbra and will explained on next section.
Good luck and hopefully useful

Nhận xét
Đăng nhận xét