How To Configure Data Replication/Synchronize on CentOS 6 Using DRBD
This article will explain how to configure data replication/synchronize using DRBD application. According this article : http://drbd.linbit.com/
In this guidance, i am build 2 systems for replication. The systems using CentOS 6 64 Bit. For easy understanding, this is my information system
First, we must configure network on CentOS. Assuming name of your network interface is eth0. Do the following configuration on all nodes (node1 and node2) and adjust on node2
# Configure Disable Selinux & Firewall on all nodes (node1 and node2)
Open file /etc/sysconfig/selinux and change SELINUX=enforcing become SELINUX=disabled. Also disable some service such as iptables and ip6tables.
# Configure /etc/hosts and hostname on all nodes (node1 and node2)
Open file /etc/hosts and configure as follows on all nodes (node1 and node2)
– On node1
Change HOSTNAME so that like below :
Change HOSTNAME so that like below :
# Configure DRBD
– Configure file /etc/drbd.conf (enough on node1 only)
fill with the following line
Note :
r0 is resources name for DRBD.
/dev/sdb is second drive on each machines that will configured for DRBD. Please check with fdisk -l command to make sure the name of second drive. Recommended capacity harddrive on each machines are same. If different, the bigger harddrive will adjust with the lower harddrive.
Recommended using 2 NIC for each machines. 1 NIC for communication with clients and 1 NIC for communication between servers using Cross cable (DRBD communication)
# Copy drbd.conf from node1 to node2 (run the following command on node1)
# Create metadata on all nodes (node1 and node2)
Run the following command
# Start DRBD services on all nodes (node1 and node2)
Run the following command
# Check DRBD status all nodes (node1 and node2)
# Configure primary DRBD on node1
Run the following command only at node1
Please wait until 100% synchronize devices among node1 and node2. You also could check the progress with the following command
After finish synchronization, you will see Connected and UpToDate among node1 and node2
In this section, i am using ext3. You can using other format such as xfs, ext4 and other
Hooray, finally DRBD has been finished configured and connected each other
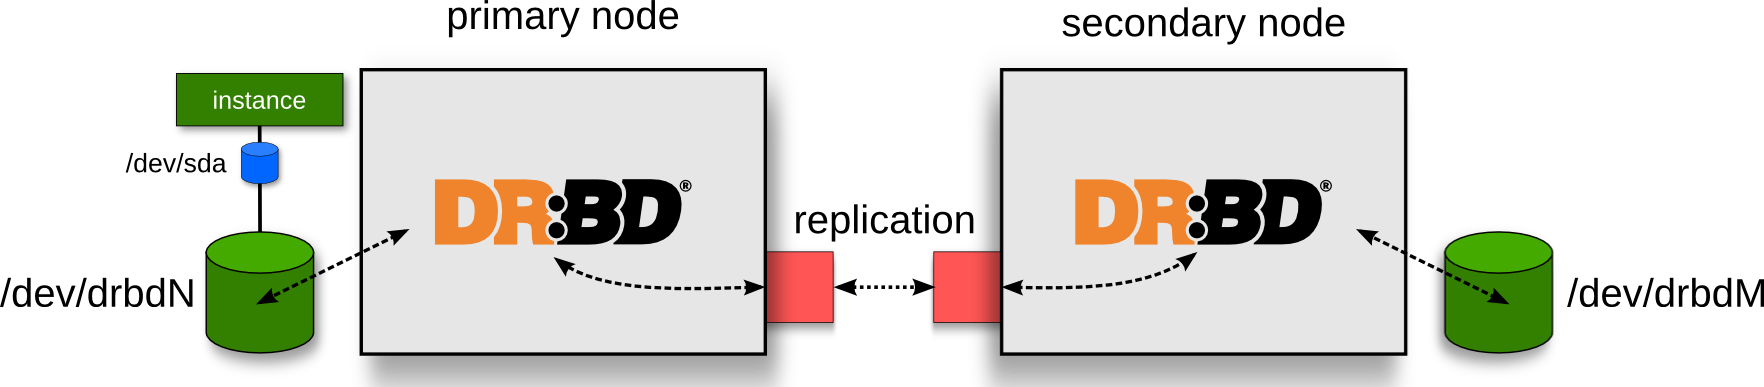
DRBD® refers to block devices designed as a building block to form high availability (HA) clusters. This is done by mirroring a whole block device via an assigned network. DRBD can be understood as network based raid-1.For configure DRBD, we should have at least 2 machines and have 2 harddrive on each machines. One harddrive will be configured as OS system and one harddrive will be configured as harddrive for replication with other harddrive on other machine
In this guidance, i am build 2 systems for replication. The systems using CentOS 6 64 Bit. For easy understanding, this is my information system
# Server 1
Hostname   : node1
Domain     : imanudin.net
IP Address : 192.168.80.91

# Server 2
Hostname   : node2
Domain     : imanudin.net
IP Address : 192.168.80.92

# Second Harddrive 1 GB on each machines for testing Purpose
# Configure Network
First, we must configure network on CentOS. Assuming name of your network interface is eth0. Do the following configuration on all nodes (node1 and node2) and adjust on node2
1.vi /etc/sysconfig/network-scripts/ifcfg-eth0DEVICE=eth0 ONBOOT=yes NM_CONTROLLED=no BOOTPROTO=none IPADDR=192.168.80.91 NETMASK=255.255.255.0 DNS1=192.168.80.91 GATEWAY=192.168.80.11 DNS2=192.168.80.11 DNS3=8.8.8.8 USERCTL=noRestart network service and setup for automatic boot on all nodes (node1 and node2)
1.service network restart2.chkconfig network onOpen file /etc/sysconfig/selinux and change SELINUX=enforcing become SELINUX=disabled. Also disable some service such as iptables and ip6tables.
1.setenforce 02.service iptables stop3.service ip6tables stop4.chkconfig iptables off5.chkconfig ip6tables offOpen file /etc/hosts and configure as follows on all nodes (node1 and node2)
127.0.0.1     localhost
192.168.80.91 node1.imanudin.net node1
192.168.80.92 node2.imanudin.net node2
Do the following command as root and open file /etc/sysconfig/network to change hostname
– On node1
1.hostname node1.imanudin.net2.vi /etc/sysconfig/networkNETWORKING=yes HOSTNAME=node1.imanudin.net– On node2
1.hostname node2.imanudin.net2.vi /etc/sysconfig/networkNETWORKING=yes HOSTNAME=node2.imanudin.net# Update repos and install packages DRBD on all nodes (node1 and node2)
2.rpm -ivh elrepo-release-6-6.el6.elrepo.noarch.rpm3.yum update4.yum install kmod-drbd83 drbd83-utils– Configure file /etc/drbd.conf (enough on node1 only)
1.vi /etc/drbd.confglobal {
dialog-refresh 1;
usage-count yes;
minor-count 5;
}
common {
syncer {
rate 10M;
}
}
resource r0 {
startup {
wfc-timeout 30;
outdated-wfc-timeout 20;
degr-wfc-timeout 120;
}
protocol C;
disk {
on-io-error detach;
}
syncer {
rate 10M;
al-extents 257;
}
on node1.imanudin.net {
device /dev/drbd0;
address 192.168.80.91:7788;
meta-disk internal;
disk /dev/sdb;
}
on node2.imanudin.net {
device /dev/drbd0;
address 192.168.80.92:7788;
meta-disk internal;
disk /dev/sdb;
}
}
Note :
r0 is resources name for DRBD.
/dev/sdb is second drive on each machines that will configured for DRBD. Please check with fdisk -l command to make sure the name of second drive. Recommended capacity harddrive on each machines are same. If different, the bigger harddrive will adjust with the lower harddrive.
Recommended using 2 NIC for each machines. 1 NIC for communication with clients and 1 NIC for communication between servers using Cross cable (DRBD communication)
# Copy drbd.conf from node1 to node2 (run the following command on node1)
1.scp /etc/drbd.conf root@node2:/etc/drbd.confRun the following command
1.drbdadm create-md r0Run the following command
1.service drbd start2.chkconfig drbd on1.service drbd statusRun the following command only at node1
1.drbdsetup /dev/drbd0 primary --overwrite-data-of-peer1.service drbd status2.watch service drbd statusdrbd driver loaded OK; device status: version: 8.4.5 (api:1/proto:86-101) GIT-hash: 1d360bde0e095d495786eaeb2a1ac76888e4db96 build by phil@Build64R6, 2014-10-28 10:32:53 m:res cs ro ds p mounted fstype 0:r0 Connected Primary/Secondary UpToDate/UpToDate C# Format device DRBD
In this section, i am using ext3. You can using other format such as xfs, ext4 and other
1.mkfs.ext3 /dev/drbd0
Nhận xét
Đăng nhận xét