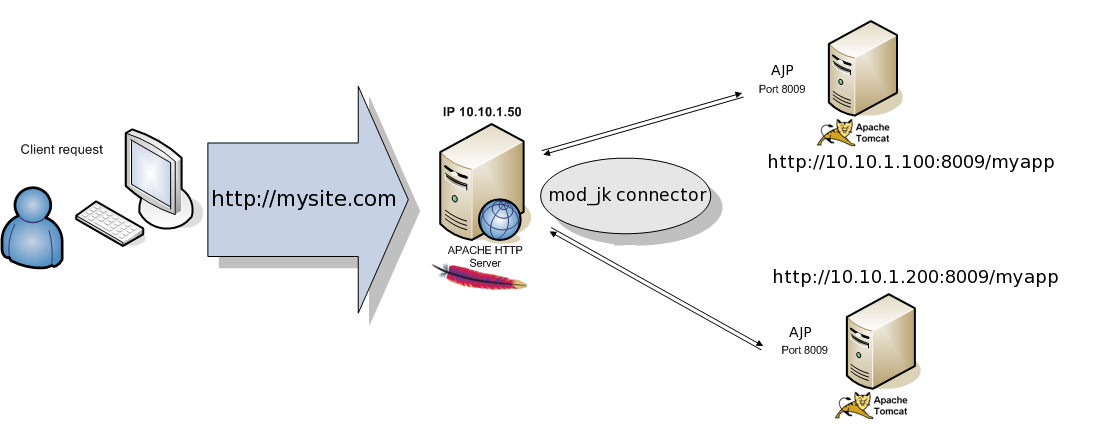
Load balancing is a technique that can distribute work across multiple server nodes. There are many software and hardware load balancing options available including HAProxy, Varnish, Pound, Perlbal, Squid, Nginx and so on. However, many web developers are already familiar with Apache as a web server and it is relatively easy to also configure Apache as a load balancer.
In this post let’s see how configuring a load balancer in front of a couple of
Tomcat Server using the
Apache HTTP Web Server and the
mod_jk connector. Furthermore I set
sticky_session to
True so that a request always gets routed back to the node which assigned thie same
jSessionID. Here the high level architecture.
Application Stack.
– Operative System: CentOS 6.x 64bit
– Apache Web Server: 2.2.15
– Tomcat Server: 6
– Mod JK connector: 1.2.37
– JDK: 1.6
STEP 1. Configure Tomcat Instance 01 – IP 10.10.1.100
|
|
# Define the jvmRoute for Tomcat 01 instance
$ vi Tomcat_home/conf/server.xml:
|
1
2
3
4
5
6
7
8
9
10
11
12
13
14
|
<Server port="8005" shutdown="SHUTDOWN">
...
<Service name="Catalina">
...
<!-- Define an AJP 1.3 Connector on port 8009 -->
<Connector port="8009" protocol="AJP/1.3" redirectPort="8443" />
...
<Engine name="Catalina" defaultHost="localhost" jvmRoute="tomcat01">
...
</Engine>
</Service>
</Server>
|
Create a sample jsp page to test the http session over the current tomcat instance.
|
|
$ vi tomcat_home/webapps/test-balancer/index.jsp
|
1
2
3
4
5
6
7
8
9
10
11
12
13
14
15
16
17
18
19
20
21
22
23
24
25
26
27
28
29
30
31
32
33
34
35
36
37
38
|
<html>
<body>
<%@ page import="java.net.InetAddress" %>
<h1><font color="red">Session serviced by NODE_01</font></h1>
<table align="center" border="1">
<tr>
<td>
Session ID
</td>
<td>
<%= session.getId() %></td>
</td>
<% session.setAttribute("abc","abc");%>
</tr>
<tr>
<td>
Created on
</td>
<td>
<%= session.getCreationTime() %>
</td>
</tr>
<tr>
<td>
Hostname:
</td>
<td>
<%
InetAddress ia = InetAddress.getLocalHost();
out.println(ia.getHostName());
%>
</td>
</tr>
</table>
</body>
</html>
|
STEP 2. Configure Tomcat Instance 02 – IP 10.10.1.200
Take care to the jvmRoute property.
|
|
# Make the same above settings using a new jvmRoute definition and a second jsp test page
$ vi Tomcat_home/conf/server.xml:
|
1
2
3
4
5
6
7
8
9
10
11
12
13
14
|
<Server port="8005" shutdown="SHUTDOWN">
...
<Service name="Catalina">
...
<!-- Define an AJP 1.3 Connector on port 8009 -->
<Connector port="8009" protocol="AJP/1.3" redirectPort="8443" />
...
<Engine name="Catalina" defaultHost="localhost" jvmRoute="tomcat02">
...
</Engine>
</Service>
</Server>
|
Create a sample jsp page to test the http session over the current tomcat instance.
|
|
$ vi tomcat_home/webapps/test-balancer/index.jsp
|
|
|
<html>
<body>
<%@ page import="java.net.InetAddress" %>
<h1><font color="red">Session serviced by NODE_02</font></h1>
<table align="center" border="1">
....
|
STEP 3. Setup the Apache Web Server and mod_jk – IP 10.10.1.50
|
|
# Setup Apache and some required libraries required to compile the mod_jk source code.
$ yum install httpd httpd-devel apr apr-devel apr-util apr-util-devel gcc gcc-c++ make autoconf openssh*
|
|
|
# Download mod_jk source
$ wget http://apache.fis.uniroma2.it/tomcat/tomcat-connectors/jk/tomcat-connectors-1.2.37-src.tar.gz
|
|
|
# Compile source and install the mod_jk
$ tar xzvf tomcat−connectors−1.2.32−src.tar.gz
$ cd tomcat−connectors−1.2.32−src/native
$ ./configure --with-apxs=/usr/sbin/apxs
$ make
$ make install
|
|
|
# Configure mod_jk properties and VirtualHost definition
$ vi /etc/httpd/conf.d/mod_jk.conf
|
1
2
3
4
5
6
7
8
9
10
11
12
13
|
LoadModule jk_module "/usr/lib64/httpd/modules/mod_jk.so"
JkWorkersFile "/etc/httpd/conf.d/worker.properties"
JkLogFile "/var/log/httpd/mod_jk.log"
JkLogLevel emerg
NameVirtualHost *:80
<VirtualHost *:80>
ServerName mysite.com
JkMount /* bal1
RewriteEngine On
</VirtualHost>
|
|
|
#Configure the balancer workers
$ vi /etc/httpd/conf.d/worker.properties
|
1
2
3
4
5
6
7
8
9
10
11
12
13
14
15
|
worker.list = bal1,stat1
worker.bal1.type=lb
worker.bal1.sticky_session=1
worker.bal1.balance_workers=tomcat01,tomcat02
worker.stat1.type=status
worker.node01.type=ajp13
worker.node01.host=tomcat-host01
worker.node01.port=8009
worker.node01.lbfactor=10
worker.node02.type=ajp13
worker.node02.host=tomcat-host02
worker.node02.port=8009
worker.node02.lbfactor=10
|
Setup the dns entries in the /etc/hosts file of the machines. You should also have the following first entry on the client machine where you are planning to open browser for the final test.
|
|
vi /etc/hosts
10.10.1.50 mysite.com
10.10.1.100 tomcat-host01
10.10.1.200 tomcat-host02
|
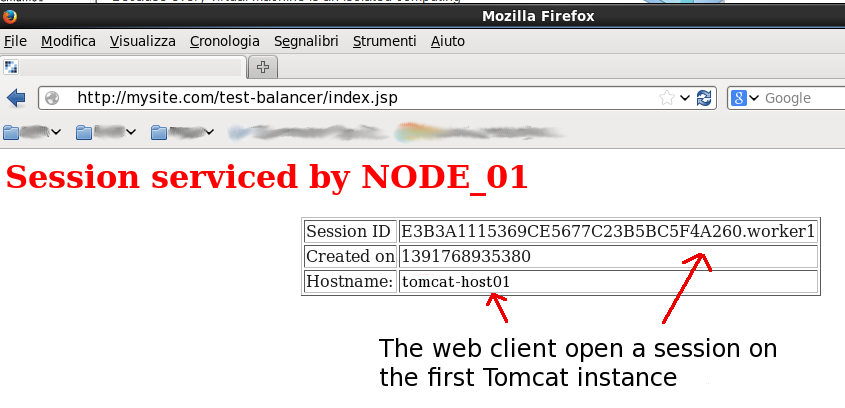
Finally test Load Balancer using the two sample jsp pages. To be sure to open a new http session, you must clear the cache from your browser then update the web page. Open your browser and go to url http://mysite.com/test-balancer/index.jsp. You can see the response coming from one of the two Tomcat instances.
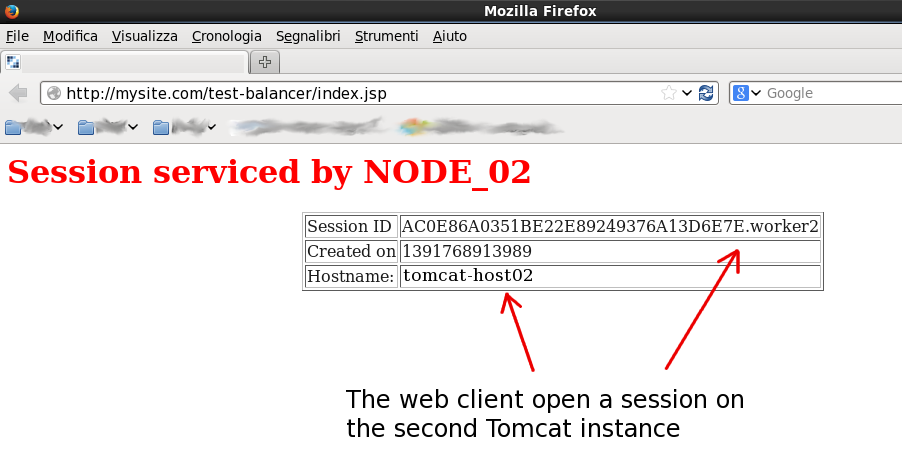
Clear the cache browser then update the web page more times until a new session over the second Tomcat instance is opened. Here the page containing the new session on the secon Tomcat instance.

Nhận xét
Đăng nhận xét