Configuring a SSL/TLS VPN with OpenVPN
openvpn is a vpn solution that implements connections for the layer 2 or 3, using the SSL/TLS protocol stack. Configuring a vpn SSL/TLS is a good idea and enhance the security of our communications due to the data cipher using the pki infraestructure (pair public/private key) and the verification and authentication of the data. Some advantages of the use openvpn are:
Basically we can configure openvpn of two ways:
The method used in this post is tun, and the addressing configured here is:
- VPN client: LAN: 192.168.0.0/24 –> NAT (public IP address)
- VPN server: (public ip address) –> LAN 172.20.0.0/16
- VPN network: 10.0.0.0/24
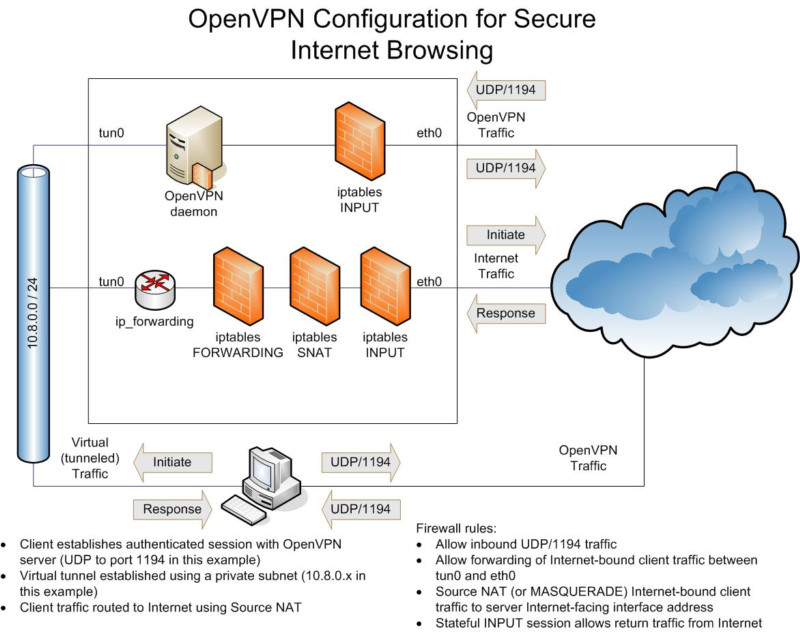
The objective is create a vpn from the client to the vpn server using his public ip address to connect for the LAN 172.20.0.0/16, for this we’ll encapsulate the packages using the virtual network created by the vpn 10.0.0.0/24.
OpenVPN server
- Install openvpn:
- Copying openvpn easy rsa scripts to the openvpn default config directory:
- Update the variables used by the scripts to create the certificates with our own information:
- Create a new CA to sign the new certificates for the vpn:
- Generate a certificate and private key for the server:
- Generate a certificate and private key for the vpn client:
- Generate diffie hellman parameters:
- Copying the keys generated for the openvpn server to the directory /etc/openvpn/:
- Configuring the vpn server config file:
Basically with this configuration we create the vpn with the virtual
network 10.0.0.0/24 and route to the local network 172.20.0.0/16 for the
clients, setting up the parameter push route. The ip address provided
to the clients are saved in the file /etc/openvpn/ipp.txt.
- Enabling routing:
- Starting openvpn daemon:
OpenVPN client
- Install openvpn:
- Copying the key and certificates for the client:
- Edit the configuration for the client with the name of the certificates, key and the ip address of the server:
- Starting openvpn daemon:
- Checking if the LAN of the remote vpn is accessible by the client:

Sources
http://openvpn.net/index.php/open-source/documentation/howto.html#install
http://openvpn.net/index.php/open-source/documentation.html
- Not necessary a static ip address for the server.
- The virtual interfaces used by the vpn may be filtered by iptables.
- Easy configuration.
- No problems with NAT, the server and the client may be in a LAN with a router using NAT.
- A single port used for the connectivity with the server, by default use 1194/udp.
Basically we can configure openvpn of two ways:
- tun (layer 3): simulate a point to point connection using IP protocol.
- tap (layer 2): simulate a virtual ethernet adapter. This method may encapsulate other protocols different than IP.
The method used in this post is tun, and the addressing configured here is:
- VPN client: LAN: 192.168.0.0/24 –> NAT (public IP address)
- VPN server: (public ip address) –> LAN 172.20.0.0/16
- VPN network: 10.0.0.0/24
The objective is create a vpn from the client to the vpn server using his public ip address to connect for the LAN 172.20.0.0/16, for this we’ll encapsulate the packages using the virtual network created by the vpn 10.0.0.0/24.
OpenVPN server
- Install openvpn:
# apt-get install openvpn |
# cp -rp /usr/share/doc/openvpn/examples/easy-rsa/2.0/ /etc/openvpn/easy-rsa |
# vi /etc/openvpn/easy-rsa/varsexport KEY_COUNTRY="ES"export KEY_PROVINCE="BCN"export KEY_CITY="Barcelona"export KEY_ORG="opentodo.net"export KEY_EMAIL="ivan@opentodo.net" |
# cd /etc/openvpn/easy-rsa/# chmod +x vars# source ./vars# ./clean-all# ./build-ca |
# ./build-key-server opentodo-vpn |
# ./build-key vpn-client |
# ./build-dh |
# cp ca.key ca.crt dh1024.pem opentodo-vpn.crt opentodo-vpn.key /etc/openvpn/ |
- Configuring the vpn server config file:
# cd /usr/share/doc/openvpn/examples/sample-config-files/# gunzip server.conf.gz# cp server.conf /etc/openvpn/ |
# vi /etc/openvpn/server.conf# Which TCP/UDP port should OpenVPN listen on?# If you want to run multiple OpenVPN instances# on the same machine, use a different port# number for each one. You will need to# open up this port on your firewall.port 1194# TCP or UDP server?;proto tcpproto udpdev tunca ca.crtcert opentodo-vpn.crtkey opentodo-vpn.keydh dh1024.pem# Configure server mode and supply a VPN subnet# for OpenVPN to draw client addresses from.# The server will take 10.8.0.1 for itself,# the rest will be made available to clients.# Each client will be able to reach the server# on 10.8.0.1. Comment this line out if you are# ethernet bridging. See the man page for more info.server 10.0.0.0 255.255.255.0# The keepalive directive causes ping-like# messages to be sent back and forth over# the link so that each side knows when# the other side has gone down.# Ping every 10 seconds, assume that remote# peer is down if no ping received during# a 120 second time period.keepalive 10 120# Push routes to the client to allow it# to reach other private subnets behind# the server. Remember that these# private subnets will also need# to know to route the OpenVPN clientpush "route 172.20.0.0 255.255.0.0"# Enable compression on the VPN link.# If you enable it here, you must also# enable it in the client config file.comp-lzo# The persist options will try to avoid# accessing certain resources on restart# that may no longer be accessible because# of the privilege downgrade.persist-keypersist-tun# Output a short status file showing# current connections, truncated# and rewritten every minute.status openvpn-status.log# Set the appropriate level of log# file verbosity.## 0 is silent, except for fatal errors# 4 is reasonable for general usage# 5 and 6 can help to debug connection problems# 9 is extremely verboseverb 3 |
- Enabling routing:
# vi /etc/sysctl.confnet.ipv4.ip_forward=1# sysctl -p |
# /etc/init.d/openvpn start |
- Install openvpn:
# apt-get install openvpn |
# scp root@vpn-server:/etc/openvpn/easy-rsa/keys/ca.crt /etc/openvpn/# scp root@vpn-server:/etc/openvpn/easy-rsa/keys/vpn-client.crt /etc/openvpn/# scp root@vpn-server:/etc/openvpn/easy-rsa/keys/vpn-client.key /etc/openvpn/ |
# cp /usr/share/doc/openvpn/examples/sample-config-files/client.conf /etc/openvpn/# vi /etc/openvpn/client.conf# The hostname/IP and port of the server.# You can have multiple remote entries# to load balance between the servers.remote vpn-server 1194# SSL/TLS parms.# See the server config file for more# description. It's best to use# a separate .crt/.key file pair# for each client. A single ca# file can be used for all clients.ca ca.crtcert vpn-client.crtkey vpn-client.key |
# /etc/init.d/openvpn start |
Sources
http://openvpn.net/index.php/open-source/documentation/howto.html#install
http://openvpn.net/index.php/open-source/documentation.html

Nhận xét
Đăng nhận xét