Configuring PEAP authentication with FreeRADIUS
PEAP (Protected Extensible Authentication Protocol) is an authentication method based in two simple steps:
This allows EAP use insecure authentication protocols like MS-CHAP v2 (Microsoft version of CHAP used in this tutorial because is the default type supported by windows clients) with a secure tunnel.
RADIUS (Remote Authentication Dial In User Service) is a network protocol that provides Authentication, Authorization and Accounting to connect network services.
I’ll configure a simple scenario with an access point authenticating the wireless access with FreeRADIUS:

Configuring FreeRADIUS
1.- Install freeradius:
2.- Edit EAP method:

3.- Adding new users :
4.- Enabling and configuring mschap-v2 protocol:

5.- Reloading new libraries:
6.- Add new radius clients (Access point):
7.- Restarting service and testing radius authentication:

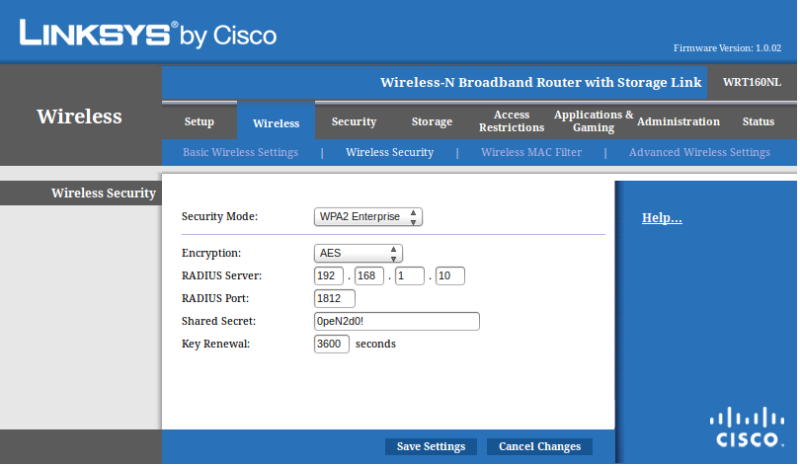
Configuring Access Point:
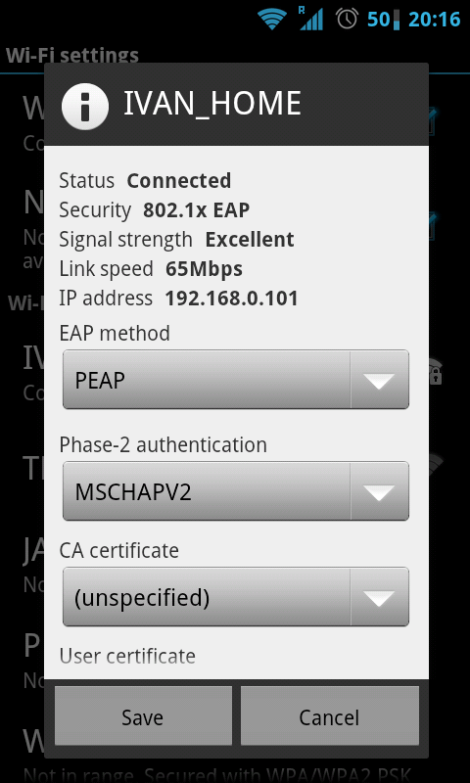
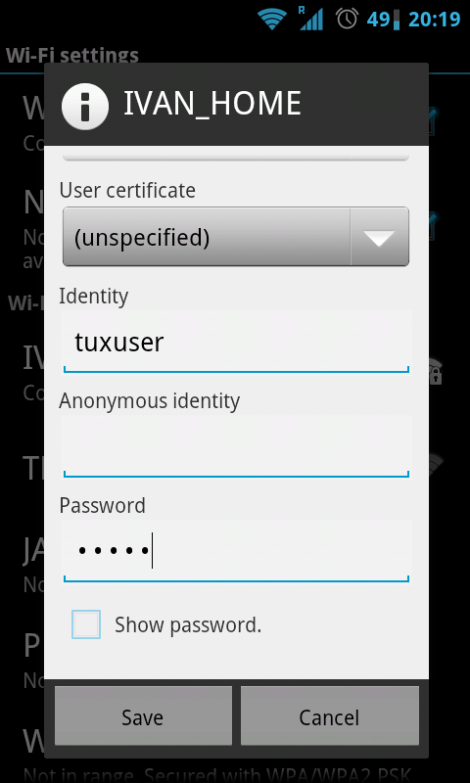
Configuring the client (Android based phone):
Official page of FreeRADIUS project:
http://freeradius.org/
- The client establishes a TLS session with the server.
- The server authenticates the client over the same digital certified with a RADIUS server.
This allows EAP use insecure authentication protocols like MS-CHAP v2 (Microsoft version of CHAP used in this tutorial because is the default type supported by windows clients) with a secure tunnel.
RADIUS (Remote Authentication Dial In User Service) is a network protocol that provides Authentication, Authorization and Accounting to connect network services.
I’ll configure a simple scenario with an access point authenticating the wireless access with FreeRADIUS:

Configuring FreeRADIUS
1.- Install freeradius:
# apt-get install freeradius |
# vi /etc/freeradius/eap.conf:default_eap_type = peap |
3.- Adding new users :
# vi /etc/freeradius/userstuxuser Cleartext-Password := "P@sswd4Tux"tuxadmin Cleartext-Password := "P@sswrd4Admin" |
4.- Enabling and configuring mschap-v2 protocol:
# vi /etc/freeradius/modules/mschapuse_mppe = yesrequire_encryption = yesrequire_strong = yeswith_ntdomain_hack = yes |
5.- Reloading new libraries:
# ldconfig |
# vi /etc/freeradius/clients.confclient 192.168.1.2/24 {secret = 0peN2d0!shortname = Linksys WRT160NL} |
# service freeradius restart |
# radtest tuxuser P@sswd4Tux 192.168.1.10 1812 0peN2d0! |
Configuring Access Point:

Configuring the client (Android based phone):


Official page of FreeRADIUS project:
http://freeradius.org/

Nhận xét
Đăng nhận xét